-
Just a quick update, I have been having engine cooling issues. I ordered a new improved head for the MZ 34. They evidently have had some overheating issues so a new head was designed that increased the fin area. I am also having a run issue with the engine; I can’t get the engine to accept any throttle. I initially thought I was having some Carb issues, because the engine starts on the Prime, but then quickly dies after the prime is consumed. So last night I tore down the engine in anticipation of installing the new head. Turns out every head bolt were less than finger tight!! Exhaust gasses were leaking past the head gasket. Since I only have less than an hour on this engine, I didn’t not re torque the head . I am still trying to break in the engine. I think this may be the reason the engine was dieseling on me. The head was not transferring any of the heat away. Anyway, I'm still waiting for the new head, and if needed, i will be adding additional cooling inlet area for the cowling. I have yet to try a "high" speed taxi. I was hoping to get at least 3 hours ground run on the engine before I reassemble at the airport. I have a feeling that fwd motion will help with the cooling issue once the new head is installed and re torque. I was able to do a static thrust test. This thing pulls like a mule!!! I recorded 210 lbs of static thrust. Once I finally get into the air, this is going to equate to some spectacular climb performance!!!
Last edited by Mark Calder; 07-02-2012 at 03:04 PM.
-
You might be able to roughly simulate forward motion by placing a box fan in front of the running engine. Before engine start, calibrate the "wind" speed with one of these and adjust by changing fan speed or moving it closer or farther away.
-
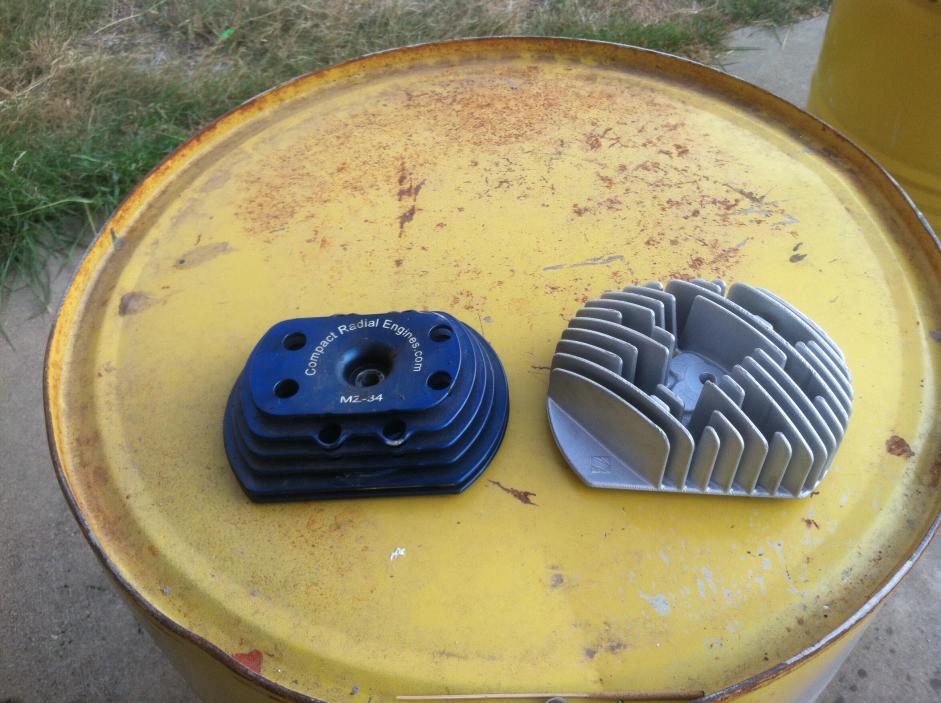
Here is a picture of the new head. Evidently Canada isn't a known terrorist country!!  The poor head wasn't on the no fly list and made it safely to the Great State of Texas!! As you can see there is a huge difference in fin area. I think I am going to assemble everything minus the cowl, spinner and baffling. I need to get another hour on the engine for break in and I obviously want easy access to these head bolts.
-
The intermittent running was caused by a split carb pulse line.However Looks like my Carb pop off pressure still isn't right. I have fuel leaking from the main jet while under pressure from the fuel tank. Most applications do not have a pressure head, so I'm not surprised that there is a leak. I have ordered the Pop off pressure tester from Tillotson. Meanwhile I am spending my "spare" time completing the seat. I have always needed to install a head rest, but as my Friend Ed mentioned today, the pilot is so reclined, that if you just support the head, you will be cranking the head over and choking the pilot. So the seat needed to be reshaped to support the upper shoulders. My seat was made in a two step process, first the tension surface was laid up on a flat foam core and then that bond assembly was forced to the seat contoured substructure. So what I did was remove a 4 inch wide swath of fiberglass to expose the core. I did this on the upper or compression surface. I them clamped the seat to a set of foam form blocks and formed the new contour. This worked quite well because the tension side is still intact and when the seat is formed, the foam will compress. I then bonded a new layer of glass to that surface. by the way, the last ply laid up is peel ply, which just happens to be the same Dacron I covered the plane with.

-
OK finally the mystery is solved. I took the advise from the aerocorsair web site http://www.aerocorsair.com/index.htm I bought a cooling system tester and converted it to check the pop off pressure of the needle seat. The float needle should have held 8 psi indefinitely. It was leaking down at less than 3 psi. I pulled the whole carb apart and checked all of the gaskets and diaphragms, and yet it still leaked. Finally I tested the needle seat using an alternate port on the carb body and I saw fuel leaking out from the base of the main needle seat. When I pulled the seat out, there was a badly deformed copper gasket. Of course there was no main needle seat copper gasket in my rebuild kit, so I made a new one by hammering out flat a piece of copper tubing and then carefully trimming it to fit. The needle held 8 psi and then popped off at 11 psi, just like it should have. I then started the engine and ran it for another 45 minutes. I'm still working on the seat, and I just finished cutting the slots for the aileron cables and installed the ailerons permanently. There are a few more minor squawks to work off, and then I should be ready for taxi. I still need to run the engine sans the baffling with the cowl, to see if she will cool.
-
-
Tags for this Thread
 Posting Permissions
- You may not post new threads
- You may not post replies
- You may not post attachments
- You may not edit your posts
-
Forum Rules


 Reply With Quote